


Medianav
Micom Manager
Medianav - Micom Manager
Il Micom manager è un menù di impostazione che è nascosto all’utente e per accedere al quale è necessario eseguire una particolare procedura di abilitazione e inserire dei codici di accesso.
Dal Micom manager è possibile effettuare alcune modifiche sia al Medianav che ad alcuni parametri di sistema.
Per poter effettuare modifiche dei parametri è anche necessario inserire nella presa USB del Medianav una chiavetta di memoria USB contenente un file di inizializzazione.
The Micom manager is a setting menu that is hidden to the user and the access to which requires the user to perform a particular enabling procedure and enter access codes.
From the Micom manager it is possible to make some changes both to the Medianav and to some system parameters.
In order to make changes to the parameters, it is also necessary to insert a USB memory stick containing an initialisation file into the Medianav USB socket.
Micom Manager MN3 1.0.15.1

Micom Manager MN3 1.0.13.3

Micom Manager MN2

Cosa serve per
accedere al Micom Manager?
Per accere al Micom manager serve:
1) identificare il modello di Medianav e la versione di SW installata
2) una chiavetta di memoria USB (max 32 GB formattata FAT32)
3) un file per abilitare le modifiche
4) conoscere i punti di pressione per abilitare l'accesso al menù segreto del Micom Manager
5) la guida con la corrispondenza tra pulsanti e funzioni

ATTENZIONE
Alcune impostazioni del Micom Manager o la pressione di tasti di cui non si conosce la funzionalità, può portare a un blocco del Medianav che non è recuperabile e richiede la riparazione tramite rete ufficiale.
Prestare molta attenzione ai tasti del Micom Manager che si premono durante le modifiche.
Si declina ogni responsabilità per errori o conseguenze inaspettate
L’utente si assume la responsabilità delle proprie azioni
What do you need to access to Micom Manager?
To access to Micom manager you need:
1) identify your Medianav model and the SW version installed
2) a USB memory stick (max 32 GB formatted FAT32)
3) a file to enable modifications
4) to know the pressure points to enable the access to the secret menu of Micom Manager
5) the guide with the correspondence between buttons and functions
WARNING
Some of the settings of Micom Manager or the pressure of keys whose functionality is unknown, can lead to a block of the Medianav which cannot be recovered and requires repair by the official network.
Pay close attention to the keys of the Micom Manager that are pressed during the changes.
No liability is assumed for errors or unexpected consequences
The user takes responsibility for its actions
Scarica la guida in italiano in PDF
o continua la lettura

Download the english language PDF guide or continue reading
Download the french
PDF guide
Scarica il file .ini per abilitare le modifiche su Medianav MN1
-
Download the .ini file to enable modifications on Medianav MN1
Scarica il file .ini per abilitare le modifiche su Medianav MN2
-
Download the .ini file to enable modifications on Medianav MN2
Scarica il file .ini per abilitare le modifiche su Medianav MN3
-
Download the .ini file to enable modifications on Medianav MN3
Identifica il tuo Medianav - Identify your Medianav
Esistono diversi modelli di Medianav:
- Medianav Standard
(indicato come MN1)
- Medianav Evolution 2
(indicato come MN2)
- Medianav Evolution 3 o Smart Evolution
(indicato come MN3)
Il Medianav Standard (MN1) è la prima versione del sistema multimediale. E’ basato su un processore a 600 MHz con 0,5 GB RAM e sistema operativo Windows CE. Se la versione del software ufficiale è la versione 4.1.0.
Il Medianav Evolution 2 (MN2) è la seconda versione del sistema multimediale. E’ basato su un processore a 667 MHz con 1 GB RAM e sistema operativo Windows CE. L’ultima versione software ufficiale è la versione 9.1.3.
Il Medianav Evolution 3 o Smart Evolution (MN3) è la terza versione del sistema multimediale. E’ basato su un processore a 2 Ghz con 2 GB RAM e sistema operativo Linux. MN3 è compatibile con Android Auto e Apple Car Play. Le versioni software partono con la release 1.0.XX.Y, ad oggi l’ultima versione del software è la versione 1.0.15.1.
Different models of Medianav exist:
- Medianav Standard
(indicated as MN1)
- Medianav Evolution 2
(indicated as MN2)
- Medianav Evolution 3 or Smart Evolution
(indicated as MN3)
The Medianav Standard (MN1) is the first version of the multimedia system. It is based on a 600 MHz processor with 0,5 GB RAM and Windows CE operating system. The last official software version is version 4.1.0.
The Medianav Evolution 2 (MN2) is the second version of the multimedia system. It is based on a 667 MHz processor with 1 GB RAM and Windows CE operating system. The last official software version is version 9.1.3.
The Medianav Evolution 3 or Smart Evolution (MN3) is the third version of the multimedia system. It is based on a 2 Ghz processor with 2 GB RAM and Linux operating system. MN3 is compatible with Android Auto and Apple Car Play. The software versions start from release 1.0.XX.Y, and up today, the last software version is version 1.0.15.2.

Come identificare il proprio modello di Medianav?
Il modo più semplice per identificare il proprio modello di Medianav è quello di verificare la versione del software installato.
How to identify your own Medianav model?
The simplest way to identify your own Medianav model is to check the installed software version.
Dalla schermata principale, selezionare “Impostazioni”

From the main screen, select “Setting”

Selezionare la voce “Sistema”
Select the menu “System”


Scorrere in basso e accedere a pagina 2
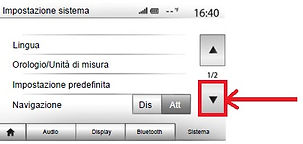
Selezionare la voce
“Versione del sistema”

- Se la versione del software è una qualsiasi versione contrassegnata dalla sigla 4.X.Y o inferiore, allora si tratta di un Medianav Standard (indicato come MN1)
- Se la versione del software è una qualsiasi versione contrassegnata da una sigla compresa tra la sigla 5.X.Y e 9.X.Y, allora si tratta di un Medianav Evolution 2 (indicato come MN2)
- Se la versione del software è una qualsiasi versione contrassegnata dalla sigla 1.0.XX.Y o superiore, allora si tratta di un Medianav Evolution 3 o Smart Evolution (indicato come MN3)
[al momento non è ancora presente un Medianav MN4]
Scroll down to access page 2
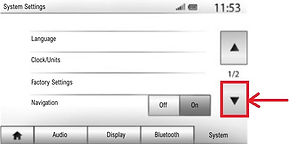
Select the menu
“System version”

- If the software version is any version identified by the identifying code 4.X.Y or lower, then it is a Medianav Standard (indicated as MN1)
- If the software version is any version identified by the identifying code between 5.X.Y and 9.X.Y, then it is a Medianav Evolution 2 (indicated as MN2)
- If the software version is any version identified by the identifying code 1.0.XX.Y or higher, then it is a Medianav Evolution 3 or Smart Evolution (indicated as come MN3)
[at the moment no Medianav MN4 is still present]
ACCESSO AL MICOM MANAGER - ACCESS TO MICOM MANAGER
Grazie a Gabriele Moretti per questo video tutorial di accesso al Micom Manager

Per accedere al Micom Manager in modalità di modifica, serve innanzitutto preparare la chiavetta di memoria USB (max 32gb - FAT32) con il file .ini che è scaricabile in questa pagina (prestare attenzione a scaricare il file corretto in base alla propria versione di Medianav tra MN1, MN2, MN3 come spiegato in precedenza)
Estrarre il file .ini contenuto nel file .zip e copiarlo nella radice della chiavetta di memoria USB
To access the Micom Manager in edit mode, you must first prepare the USB memory stick (max 32gb - FAT32) with the .ini file that can be downloaded on this page (pay attention to download the correct file based on your Medianav version between MN1, MN2, MN3 as explained above)
Extract the .ini file contained in the .zip file and copy it to the root of the USB memory stick


Inserire la chiavetta di memoria USB nella presa USB del Medianav

Dalla schermata principale, selezionare “Impostazioni”
Selezionare la voce “Sistema”
Scorrere in basso e accedere a pagina 2
Selezionare la voce
“Versione del sistema”
Sulla pagina che visualizza la versione del software, premere nella sequenza indicata i punti indicati da 1 a 5, cioè, premere prima il punto indicato con “1”, poi il punto indicato con “2”, eccetera fino al punto indicato con “5”.

Nella guida in PDF è presente una maschera da stampare e ritagliare che aiuta a identificare i punti e che riporta anche i codici di accesso per le varie versioni
Insert the USB memory stick into the USB socket of the Medianav


From the main screen, select “Setting”
Select the menu “System”
Scroll down to access page 2
Select the menu
“System version”
On the page that displays the software version, press the indicated points from 1 to 5 in the indicated sequence, that is, first press the point indicated with “1”, then the point indicated with “2”, etc. up to the point indicated with “5”.
Source: Youtube Buzzer
Medianav Evolution 9.3.1 Menu secret MICOM Renault.
https://www.youtube.com/watch?v=nf4EF_oq0SQ&app=desktop
In the PDF guide there is a mask to print and cut out which helps to identify the points and which also reports the access codes for the various versions

Se la sequenza dei punti di pressione è corretta, appare la seguente schermata
If the pressure point sequence is correct, the following screen appears

Segue una procedura di inserimento in due fasi per l'inserimento di una coppia di codici che dipendono dal modello di Medianav e dalla versione del software installato.
Nella seguente tabella è possibile recuperare i codici in funzione della propria versione.
A two-step insertion procedure follows for entering a couple of codes which depend on the Medianav model and installed software version.
In the following table you can get the codes according to your version.

1) Inserire il primo codice tramite la tastiera sullo schermo
1) Insert the first code by means of the on-screen keyboard

2) Premere il tasto "OK"
3) Tramite il tasto "BACK" cancellare il codice immesso in precedenza
2) Press the "OK" key
2) By means of the "BACK" key delete the previously inserted code

4) Inserire il secondo codice tramite la tastiera sullo schermo
4) Insert the second code by means of the on-screen keyboard

5) Premere il tasto "OK"
5) Press the "OK" key
Appare la seguente schermata
The following sceen appears

Se si è inserita precedentemente la chiavetta di memoria USB con il file .ini corretto, allora il tasto "MICOM TEST" è abilitato e si può accedere alla pagina di impostazione premendolo.
Se il tasto "MICOM TEST" è disabilitato, allora il file .ini presente sulla chiavetta non ha il nome corretto (verificarlo)
ATTENZIONE
Alcune impostazioni del Micom Manager o la pressione di tasti di cui non si conosce la funzionalità, può portare a un blocco del Medianav che non è recuperabile e richiede la riparazione tramite rete ufficiale.
Prestare molta attenzione ai tasti del Micom Manager che si premono durante le modifiche.
Si declina ogni responsabilità per errori o conseguenze inaspettate
L’utente si assume la responsabilità delle proprie azioni
If you have previously inserted the USB memory stick with the correct .ini file, then the "MICOM TEST" key is enabled and you can access the setup page by pressing it.
If the "MICOM TEST" key is disabled, then the .ini file on the key does not have the correct name (check it)
WARNING
Some of the settings of Micom Manager or the pressure of keys whose functionality is unknown, can lead to a block of the Medianav which cannot be recovered and requires repair by the official network.
Pay close attention to the keys of the Micom Manager that are pressed during the changes.
No liability is assumed for errors or unexpected consequences
The user takes responsibility for its actions
La pagina di impostazione è differente in funzione del modello di Medianav e della versione del software. Di seguito si riportano le varie versioni disponibili.
Fare attenzione a riferirsi alla propria versione di schermata
The setup page is different depending on the Medianav model and on the software version. Below the various versions available are reported.
Be careful to refer to your screen version
PAGINA DI IMPOSTAZIONE MN3 -> Vedere guida in PDF scaricabile
MN3 SETUP PAGE -> See downloadable PDF guide
PAGINA IMPOSTAZIONE MN2 SW 8.x.x -> Vedere guida in PDF scaricabile
MN2 SW version 8.x.x SETUP PAGE -> See downloadable PDF guide
PAGINA IMPOSTAZIONE MN1 -> Vedere guida in PDF scaricabile
MN1 SETUP PAGE -> See downloadable PDF guide
RICONOSCIMENTI - CREDITS
Le informazioni raccolte in questo documento derivano da una ricerca e raccolta di materiale presente sul WEB, per il quale si ringraziano:
- Franco Nobile per il tutorial di creazione dei file .ini
https://www.facebook.com/franco.nobile.9/videos/10215744130705139/
- Forum - Software di Navigazione Mappe per PPC-PNA-Autoradio
https://www.mobimart.it/showthread.php?4492764-Micom-Manager-men%F9-segreto-MediaNav-Evolution
- Mondo Duster
http://www.mondoduster.it/2017/09/richiamare-micom-manager-medianav-evolution-8-0-5-aggiornato-9-1-1/
- Lisandru
https://lisandru.eu/automotive/renault-dacia-medianav-tips/how-to-use-micom-manager-hidden-manager-to-medianav-evolution-8-0-5-9-1-x-10-0-xx-x.html
- Forum Clio
https://lamiaclio.forumcommunity.net
- Forum M’sieurlolo https://msieurlolo.fr
- dacianer
https://www.dacianer.de/resources/medianav-evolution-micom-test-menue-zugriffscodes-einstellungen.85/
The information collected in this document derives from a research and collection of material on the WEB, for which we thank:
- Franco Nobile for the tutorial for creation of .ini files
https://www.facebook.com/franco.nobile.9/videos/10215744130705139/
- Forum - Software di Navigazione Mappe per PPC-PNA-Autoradio
https://www.mobimart.it/showthread.php?4492764-Micom-Manager-men%F9-segreto-MediaNav-Evolution
- Mondo Duster
http://www.mondoduster.it/2017/09/richiamare-micom-manager-medianav-evolution-8-0-5-aggiornato-9-1-1/
- Lisandru
https://lisandru.eu/automotive/renault-dacia-medianav-tips/how-to-use-micom-manager-hidden-manager-to-medianav-evolution-8-0-5-9-1-x-10-0-xx-x.html
- Forum Clio
https://lamiaclio.forumcommunity.net
- Forum M’sieurlolo https://msieurlolo.fr
- dacianer
https://www.dacianer.de/resources/medianav-evolution-micom-test-menue-zugriffscodes-einstellungen.85/