


Medianav - Aggiornamento Update SW
Toolbox
Di seguito i dettagli per fare l'aggiormaento del Medianav tramite il canale ufficiale Dacia e il software Toolbox
Next you can find details for the Medianav update by means of the official Dacia channel and the Toolbox software
Scarica la guida in italiano su come fare l'aggiornamento del proprio Medianav [PDF]
o continua la lettura

Download english guide about how to update your own Medianav [PDF]
or proceed reading

ATTENZIONE
L'aggiornamento tramite questo strumento non invalida la garanzia
Tuttavia alcune operazioni vanno effettuate con attenzione
WARNING
Update by means of this instrument doen not render void warranty
Anyway some of the operations need to be carried out with care
Materiale necessario
Per procedere serve il seguente materiale:
Required materials
In order to proceed, the following materials are required:
Personal Computer

Personal Computer
Chiavetta USB (taglia consigliata non superiore a 32 GB)
Consigliata versione con led per verificare il progresso della attività

USB memory stick (suggested size not greater than 32 GB)
Version with LED suggested to check activity progress
Passi da seguire
ATTENZIONE
Si declina ogni responsabilità per errori o conseguenze inaspettate. L’utente si assume la responsabilità delle proprie azioni
Gli interventi effettuati sul Medianav possono invalidare la garanzia del prodotto
PERICOLO
Le operazioni sulla macchina vanno fatte con
MOTORE ACCESO
per evitare che lo spegnimento automatico temporizzato del Medianav possa compromettere la procedura di installazione
(PERICOLO DI GUASTO AL SISTEMA MULTIMEDIALE)
Steps to follow
Warning
No liability is assumed for errors or unexpected consequences. The user takes responsibility for its actions
Modifications on Medianav can invalidate the product warranty
DANGER
Operations on the car must be carried out with the
ENGINE ON
to prevent the timed automatic shutdown of the Medianav from compromising the installation procedure
(DANGER OF FAILURE OF THE MULTIMEDIA SYSTEM).
Parte 1
Preparazione chiavetta USB
da computer

Part 1
Preparing USB stick
by means of computer
-
Collegare la chiavetta USB al Personal Computer
-
Controllare se la chiavetta contiene dati ed eventualmente farne una copia su altro supporto per evitare la perdita dei dati contenuti
-
Eseguire una formattazione della chiavetta USB selezionando il formato FAT32 o EX-FAT (in funzione del sistema operativo presente sul Personal Computer)
-
Connect the USB stick to the Personal Computer
-
Check whether the USB stick contains data and, if necessary, make a copy on another medium to avoid the loss of the contained data
-
Format the USB stick by selecting the FAT32 or EX-FAT format (depending on the operating system on the Personal Computer)
ATTENZIONE
Questa operazione cancellerà tutti i dati presenti sulla chiavetta
WARNING
This operation will erase all data which are present in the USB memory stick


Per avviare la formattazione, aprire il programma “Esplora Risorse”, con il puntatore del mouse spostarsi sulla icona della chiavetta USB (“Nome” nella immagine a sinistra in figura), premere il pulsante destro del mouse per aprire il menù dei comandi (immagine al centro in figura) e selezionare “Formatta…” per aprire il menù di formattazione (immagine a destra in figura), impostare la voce “File system” a FAT32 o EX-FAT (in funzione del sistema operativo presente sul Personal Computer), poi premere “Avvia”.
To start formatting, open the "Windows Explorer" program, use the mouse pointer to move to the USB stick icon ("Name" in the image on the left side of the picture), press the right mouse button to open the command menu (image in the centre in the figure) and select "Format ..." to open the formatting menu (image on the right side of the figure), set the "File system" box to FAT32 or EX-FAT (depending on the operating system on the Personal Computer), then press "Start".
Parte 2
Installazione TOOLBOX
Part 2
TOOLBOX installation
L’aggiornamento del software del Medianav può essere fatto anche attraverso il canale ufficiale Dacia.
Requisiti di sistema:
- PC con Windows 7 o versione successiva,
- MAC con OS X 10.10 o versione successiva
Strumenti necessari:
Chiavetta USB (capacità consigliata di almeno 8 GB – massimo 32 GB). Consigliata versione con led per verificare il progresso della attività.
Software necessario
L’aggiornamento avviene tramite un programma denominato Toolbox che è scaricabile dal sito ufficiale Dacia, in due versioni differenti, per MACOS e per WINDOWS.
Si mette a disposizione la versione scaricata del Toolbox direttamente nelle apposite cartelle per comodità.
Se si vuole scaricare direttamente dal sito Dacia visitare la pagina corrispondente a questo link:
The Medianav software update can also be done through the official Dacia channel.
System requirements:
- PC with Windows 7 o later
- MAC with OS X 10.10 or later
Required materials:
USB memory stick (recommended capacity of at least 8 GB - maximum 32 GB). Version with LED suggested to check activity progress.
Required Software
The update occurs by means of a software called Toolbox which can be downloaded from the official Dacia website, in two different versions, for MACOS and for WINDOWS.
The downloaded version of the Toolbox directly in the respective folders for convenience is provided.
If you want to download directly from the Dacia website, visit the page corresponding to this link:
Download Dacia Toolbox Windows
Download Dacia Toolbox MAC OS


Una volta scaricato il file di installazione per WINDOWS o MACOS seguire le relative istruzioni di installazione sul computer.
Once the installation file for WINDOWS or MACOS has been downloaded, follow the installation instructions on the computer.
NOTA: è necessario effettuare una registrazione di un proprio account.
NOTE: you need to register an account to sign in.


Parte 3
Aggiornamento
Part 3
Update
Passo 1
Sincronizzare la chiavetta USB con il MEDIANAV
Step 1
Synchronize the USB memory stick with the MEDIANAV


Di seguito il dettaglio delle istruzioni e delle schermate.
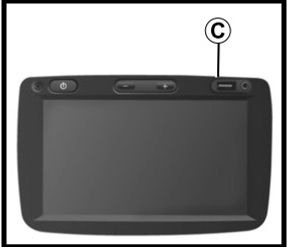
Inserire la chiavetta USB nel sistema MEDIANAV (presa USB indicata con “C” in figura) e accendere il MEDIANAV
Details of instructions and screen shot follow.
Insert the USB memory stick into the MEDIANAV system (USB socket indicated with "C" in the figure) and turn on the MEDIANAV
Premere l'icona di Navigazione > Opzioni > Aggiornamento mappe > Opzioni > Aggiorna
Press the Navigation icon> Options> Map update> Options> Update
PERICOLO
Le operazioni sulla macchina vanno fatte con
MOTORE ACCESO
per evitare che lo spegnimento automatico temporizzato del Medianav possa compromettere la procedura di installazione
(PERICOLO DI GUASTO AL SISTEMA MULTIMEDIALE)

DANGER
Operations on the car must be carried out with the
ENGINE ON
to prevent the timed automatic shutdown of the Medianav from compromising the installation procedure
(DANGER OF FAILURE OF THE MULTIMEDIA SYSTEM).

Seguire le istruzioni che richiedono conferme a video e attendere il completamento della copiatura dei dati del sistema sulla la chiavetta USB
Follow the instructions that require confirmation on the screen and wait for the copying of the system data to the USB memory stick to complete
Passo 2
Una volta finita la sincronizzazione, scollegare la chiavetta USB dall'unità principale e spostarsi al computer.
Avviare il computer e aprire l’applicazione Toolbox.
Effettuare la registrazione o, se già fatta, effettuare il login.
NOTA: DACIA fornisce un aggiornamento mappe gratuito da effettuare entro 90 giorni dal primo utilizzo del sistema di navigazione. L’aggiornamento automatico propone direttamente aggiornamento di sistema e delle mappe.
Collegare la chiavetta USB al computer.
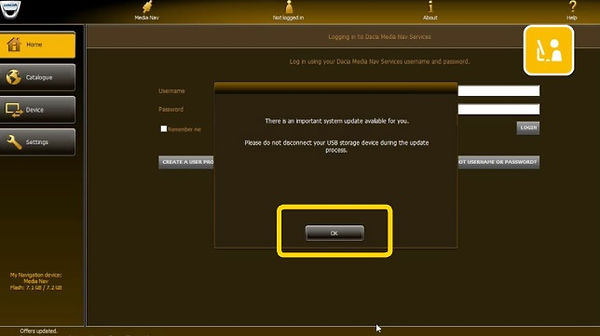
Toolbox riconosce la presenza del file di sistema sulla chiavetta, verifica la disponibilità di aggiornamenti e chiede la conferma per procedere con l’installazione.
Fare clic su Installa per scaricare e installare i contenuti disponibili sulla chiavetta USB
Step 2
Once synchronization is finished, disconnect the USB memory stick from the main unit and move to the computer.
Start the computer and open the Toolbox application.
Register or, if already done, log in.
NOTE: DACIA provides a free map update to be made within 90 days of the first use of the navigation system. The automatic update directly proposes system and map updates.
Connect the USB stick to the computer.
Toolbox recognizes the presence of the system file on the stick, checks for updates and asks for confirmation to proceed with the installation.
Click Install to download and install the available update content on the USB memory stick
Passo 3
Una volta finita la copiatura automatica dei file su chiavetta USB, rimuoverla dal computer e spostarsi nella autovettura.
Step 3
Once the automatic copying of the files to the USB memory stick is finished, remove it from the computer and move to the car.
Eseguire i seguenti passi:
Accendere la macchina (motore acceso)
Spegnere il Medianav, se acceso
Inserire la chiavetta nella presa USB del Medianav
Accendere il Medianav e attendere che il Medianav legga la chiavetta. Il sistema riconosce la presenza del file upgrade.lgu” e, riconosciutolo come aggiornamento di sistema, apre un messaggio di richiesta di conferma per procedere
Confermare l’aggiornamento. Attendere fino a completamento dell’aggiornamento (Nota la seguente schermata è presa dal manuale ma differisce da quella che compare a video. Seguire le indicazioni così come compaiono a video sul Medianav)
Follow the steps:
Turn on the engine (engine on)
Turn off Medianav, if it is turned on
Insert the memory stick into the USB socket of Medianav
Turn on Medianav and wait for Medianav to read the memory stick. The system recognizes the presence of the “upgrade.lgu” file and, after recognizing it as a system update, it opens a request message to confirm the procedure.
Confirm the update. Wait until the update is complete (Note the following screen is taken from the manual but differs from the one that appears on the screen. Follow the instructions as they appear on the screen of the Medianav)


PERICOLO
non spegnere il motore e non premere tasti del Medianav
(PERICOLO DI GUASTO AL SISTEMA MULTIMEDIALE)
DANGER
Do not turn off the engine and do not press push buttons on the Medianav
(DANGER OF FAILURE OF THE MULTIMEDIA SYSTEM).
Durante la procedura di aggiornamento il Medianav potrà effettuare due cicli di riavvio del sistema.
Attendere fino ad operazione conclusa.
Si capirà che l’operazione è terminata quando, dopo il riavvio finale del Medianav, comparirà nuovamente il messaggio di richiesta di conferma per procedere alla installazione oppure la schermata iniziale di avvio del Medianav.
Non confermare la richiesta di installazione (ad esempio premendo il tasto “Home”) e rimuovere la chiavetta USB dal Medianav.
During the update procedure, Medianav could perform two system restart cycles.
Wait until the operation is completed.
You will understand that the operation is complete when, after the final restart of the Medianav, the installation confirmation request message appears again or the initial start screen of the Medianav appears.
Do not confirm the installation request (for example by pressing the "Home" button) and remove the USB memory stick from Medianav.